


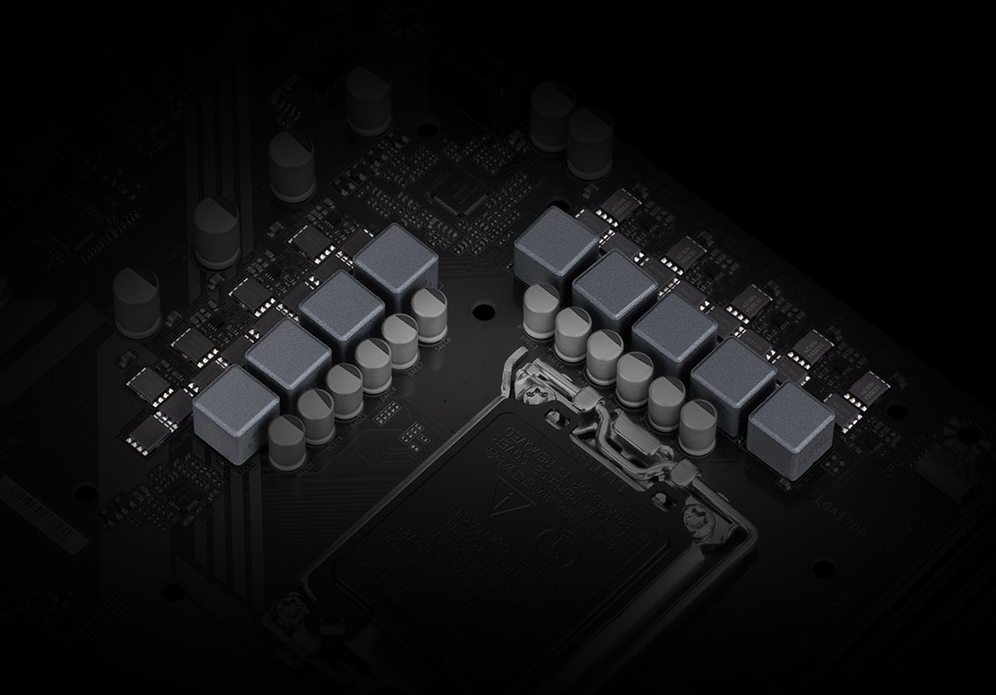
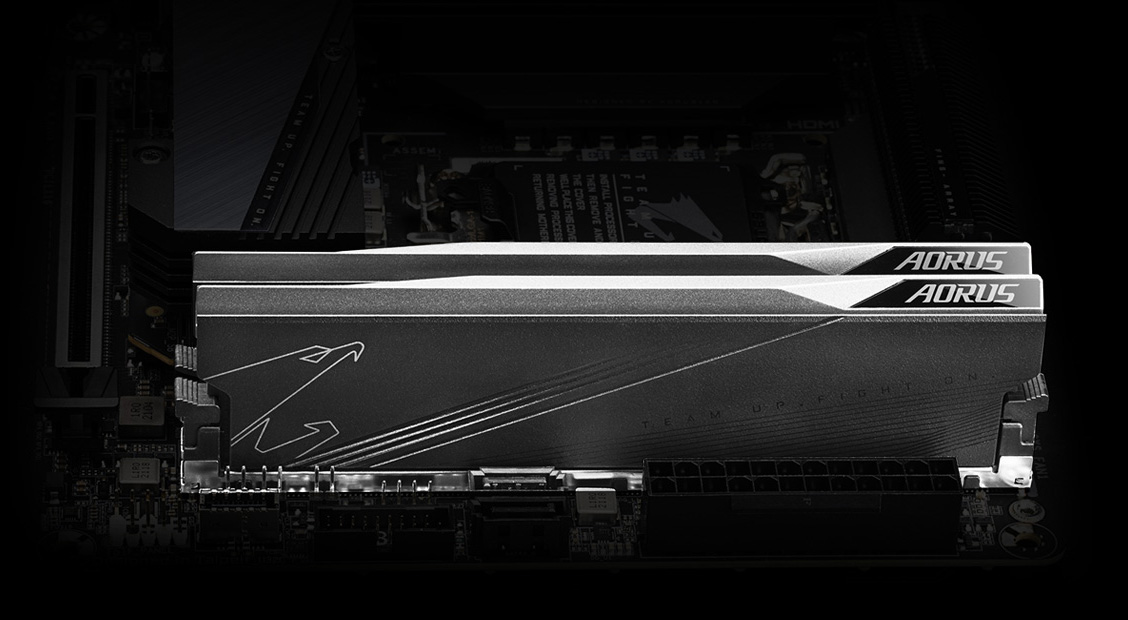
• 6+2+1 Phases Low RDS(on) MOSFETs
• Premium Choke and Capacitors to improve transient response and minimize oscillation
 - 主板")
1/4


- Intel® LGA 1700插槽:支持第14代&13代&12代系列处理器
- 强劲性能:6+2+1相供电设计
- 双通道DDR5:2*内存插槽支持XMP内存模块
- 新一代存储:2*PCI-E 4.0 x4 M.2 SSD插槽
- EZ-Latch快易拆:快速拆卸和免工具设计的PCI-E 4.0x16插槽
- 高速网络:2.5千兆高速网卡
- 扩展接口:HDMI, VGA
- Smart Fan 6:集成多点测温功能并采用混合式风扇插座与支持FAN STOP技术
- Q-Flash Plus:免安装CPU、内存、显卡即可轻松更新BIOS
OVERVIEW
PERFORMANCE
CONNECTIVITY
PERSONALIZATION
ULTRA DURABLE
Performance
Connectivity
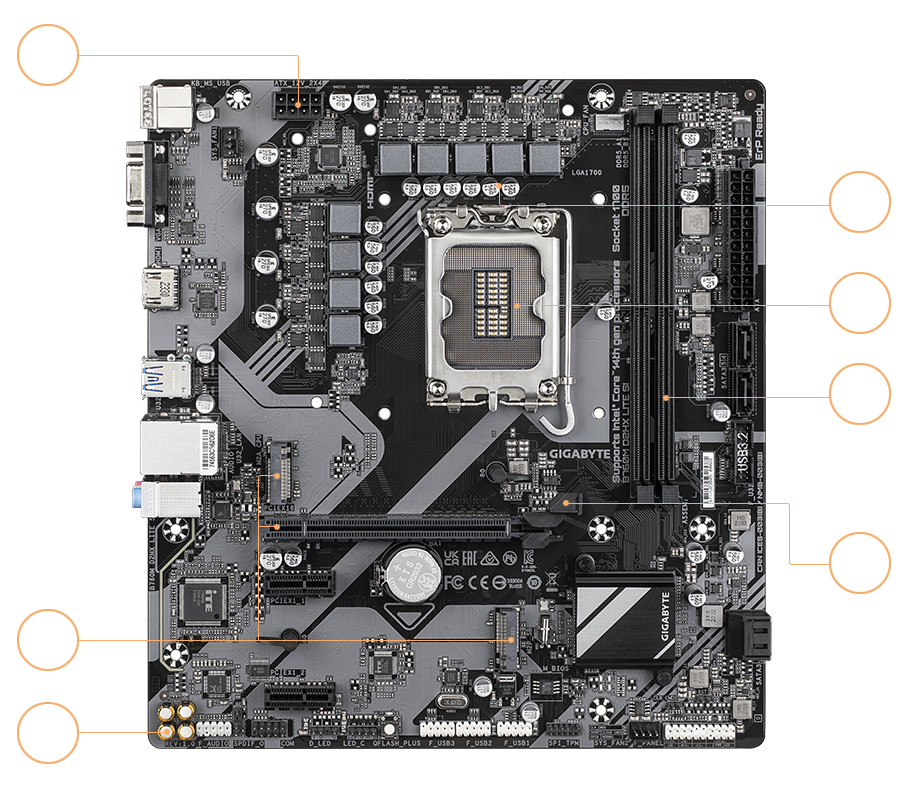
1
8 Solid Pin CPU Power Connector
2
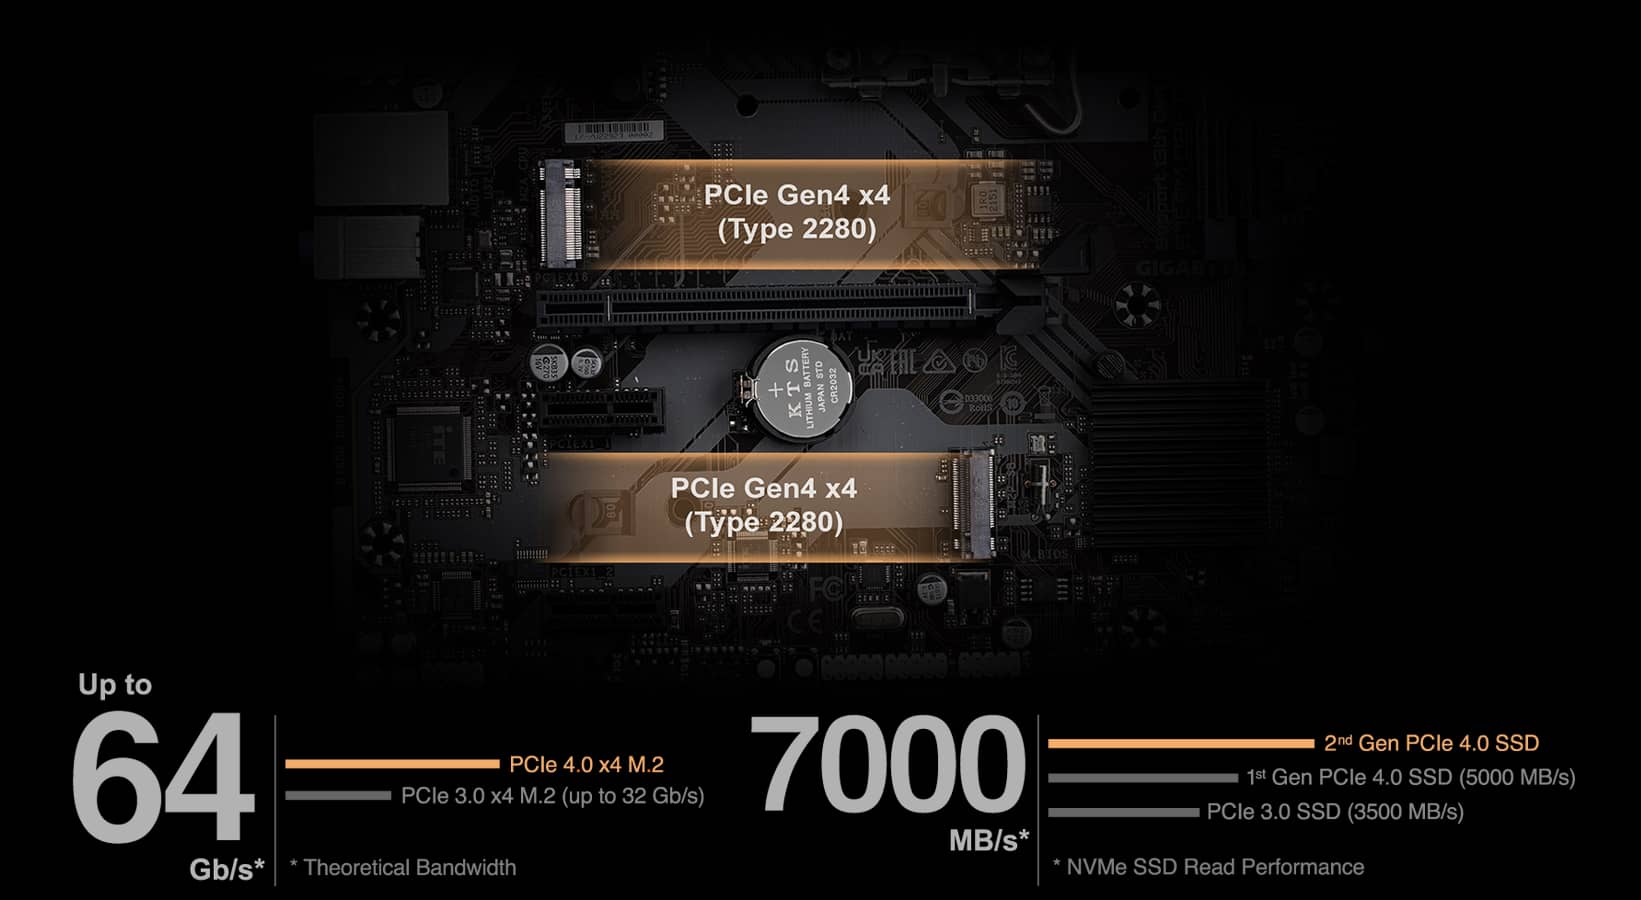
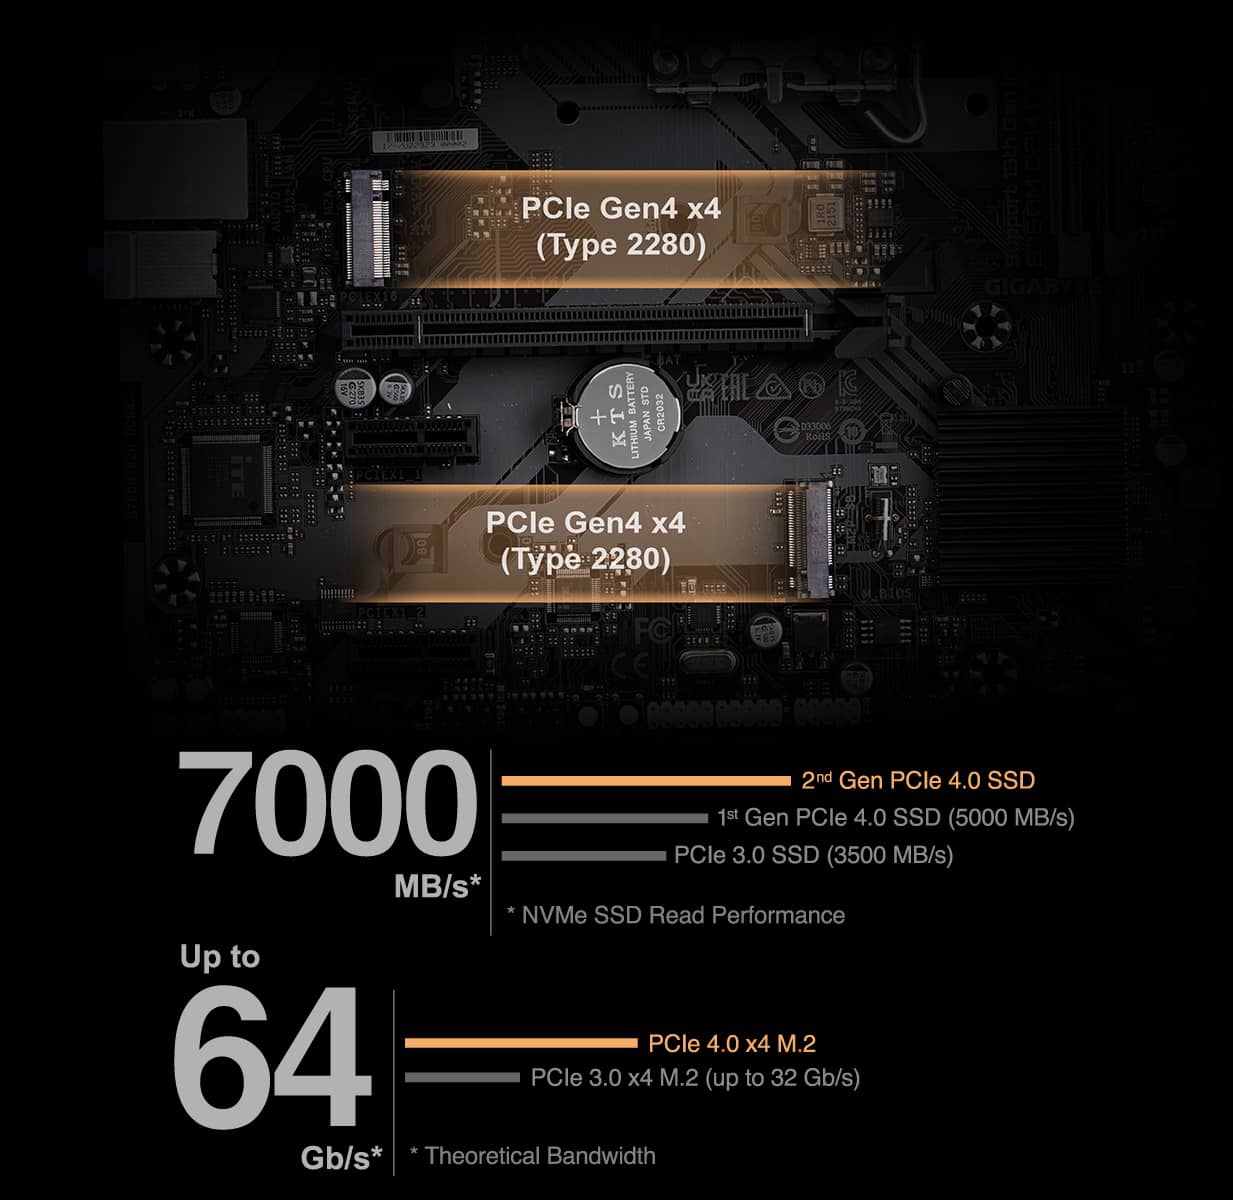
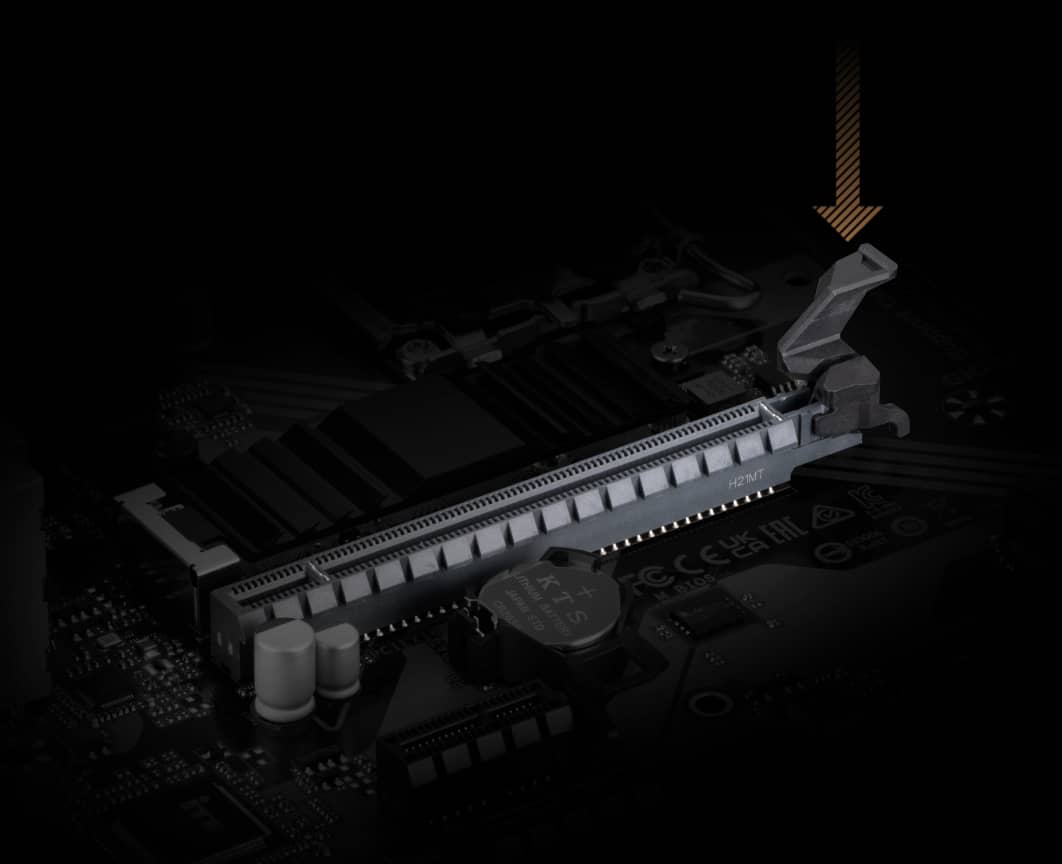
PCIe 4.0 Design
- 1*PCIe 4.0 x16 slot
- 2*PCIe 4.0 x4 M.2 Connectors
3
Audio Solution
- 8-ch HD Audio
- Audio Noise Guard
- High-End Audio Capacitors
4
6+2+1 Hybrid Digital VRM Design
5
Support 14th, 13th and 12th Gen. Intel® Core™ Processors
6
Dual Channel DDR5, 2 DIMMs
7
PCIe EZ-Latch

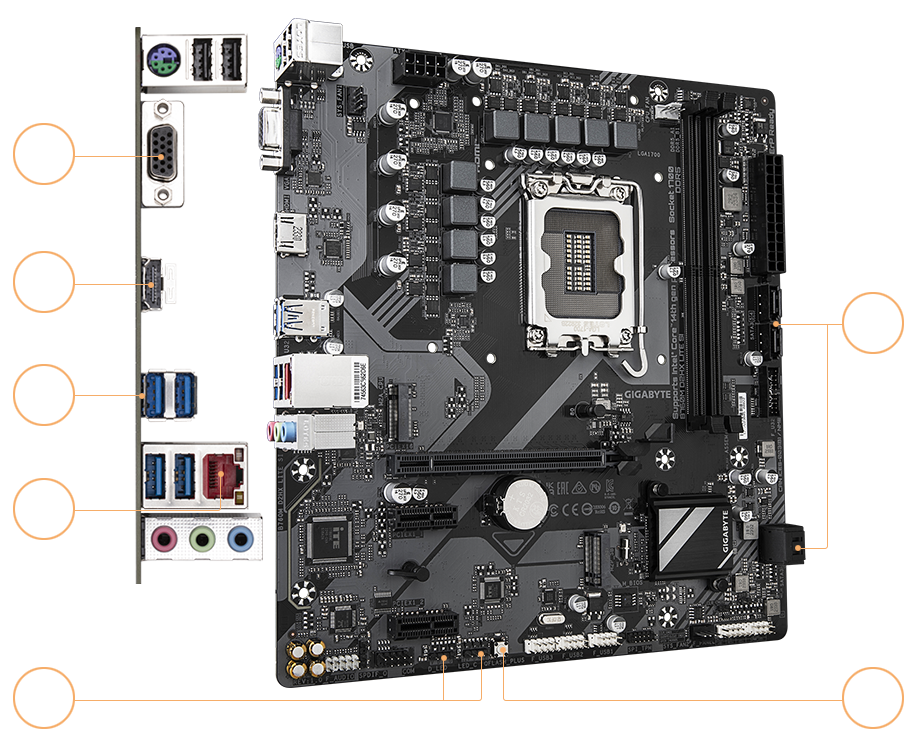
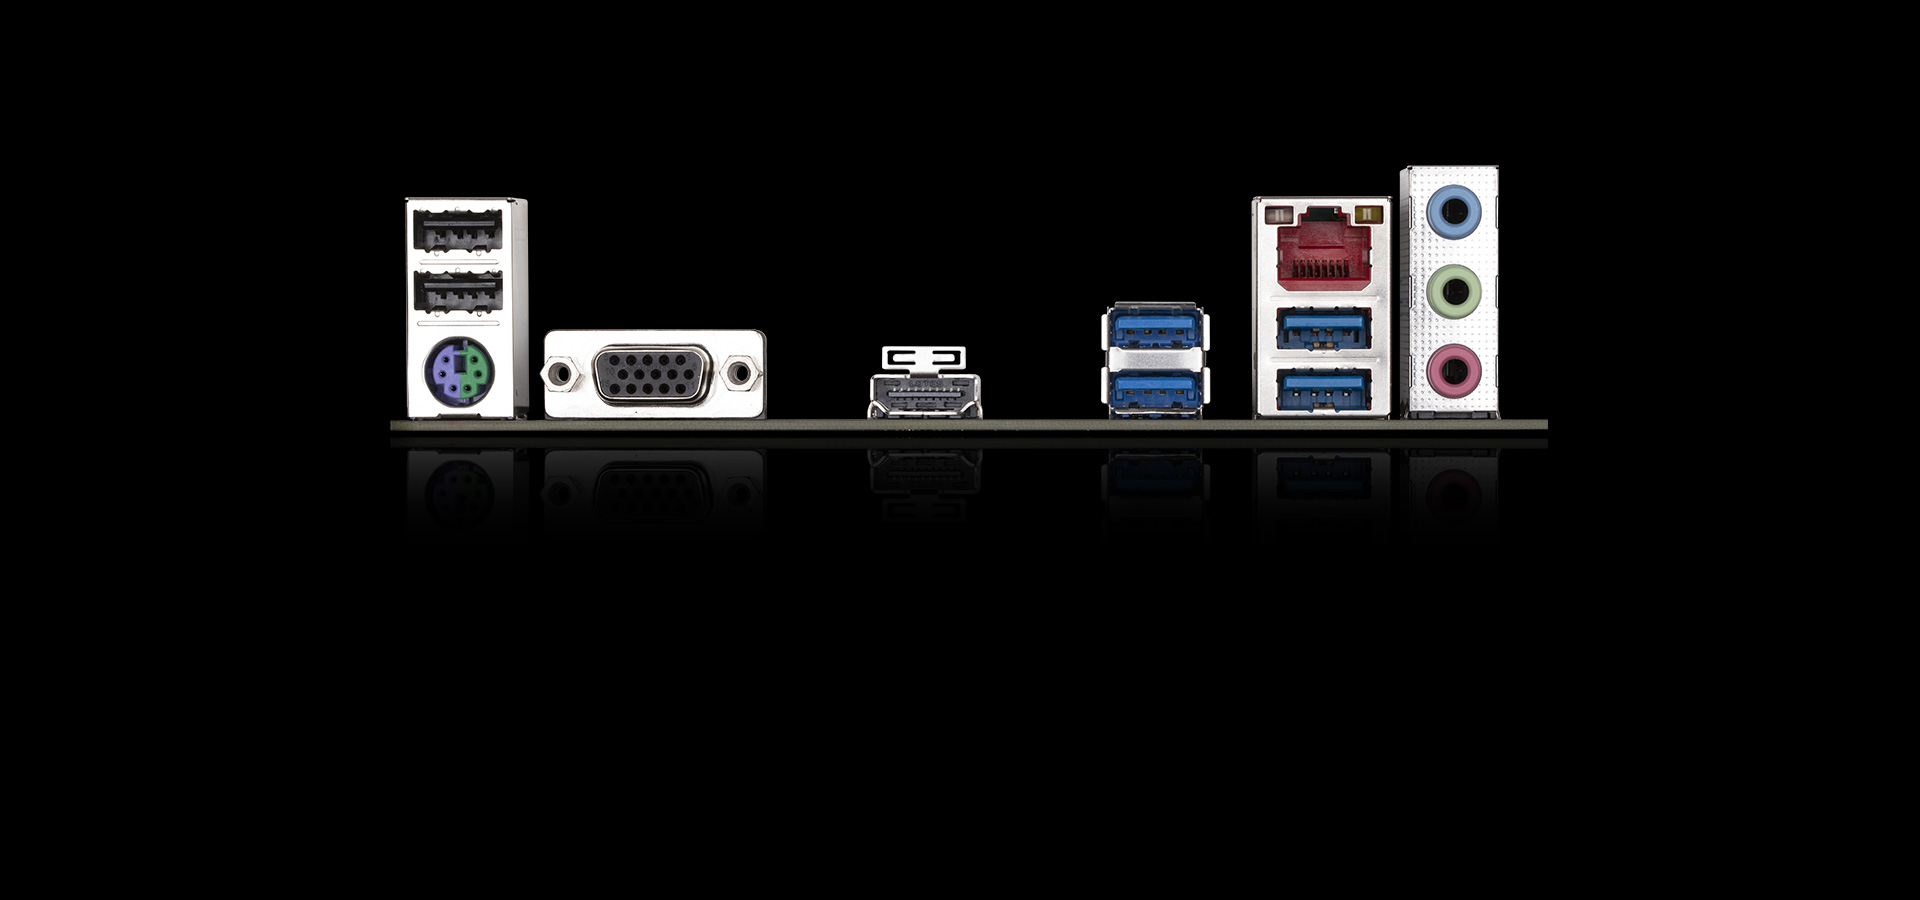
1
D-Sub
2
HDMI
3
USB3.2 Gen 1
4
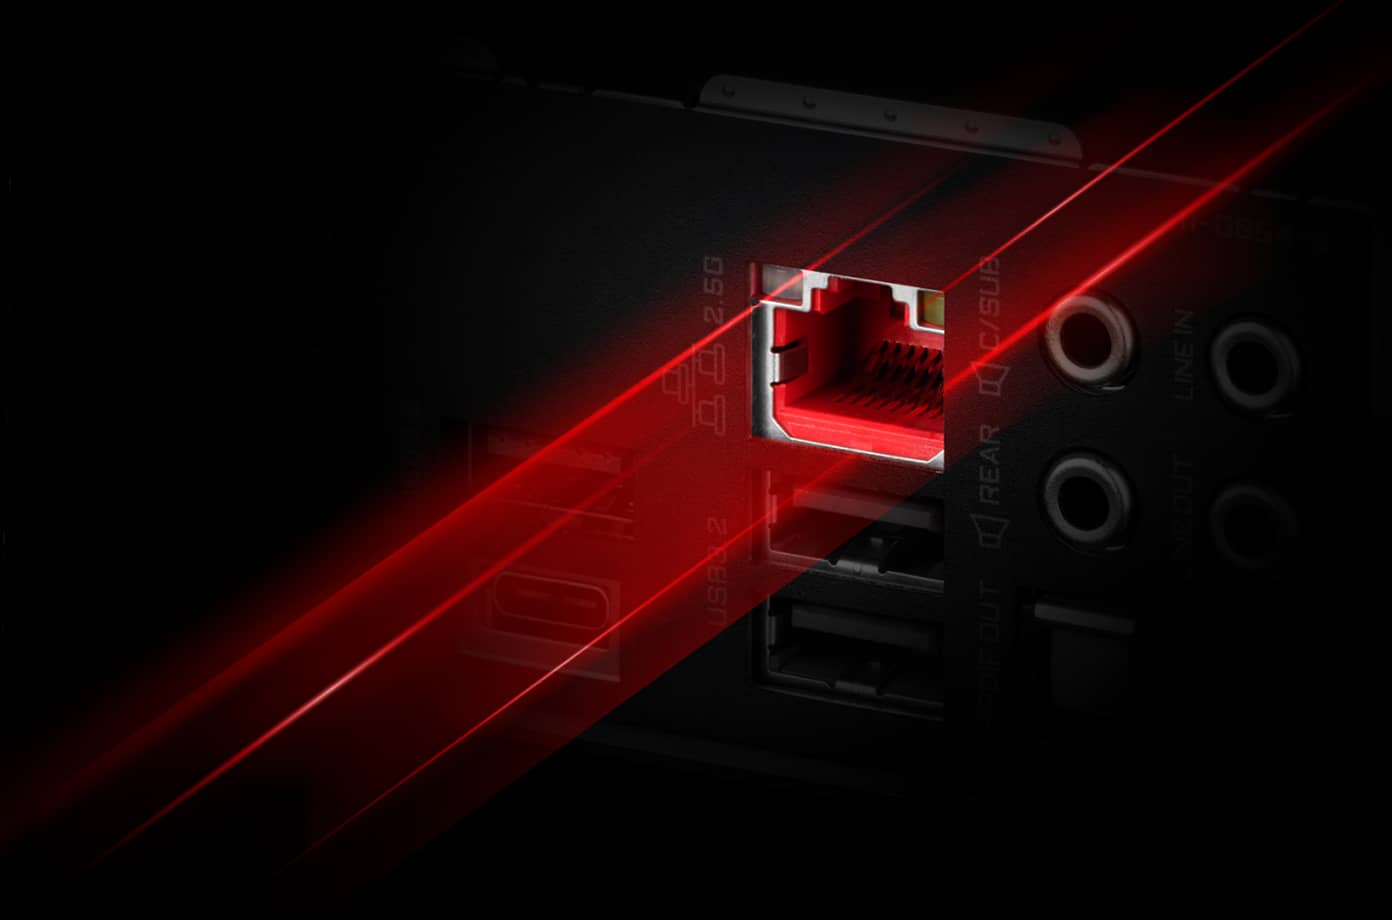
2.5 GbE LAN
5
RGB FUSION
- 1*Addressable LED Header
- 1*RGB LED Header
6
4*SATA 3
7
Q-Flash Plus onboard Button

UNPARALLELED PERFORMANCE
PERFORMANCE
Hybrid Digital VRM Design
PCIe 4.0 Design
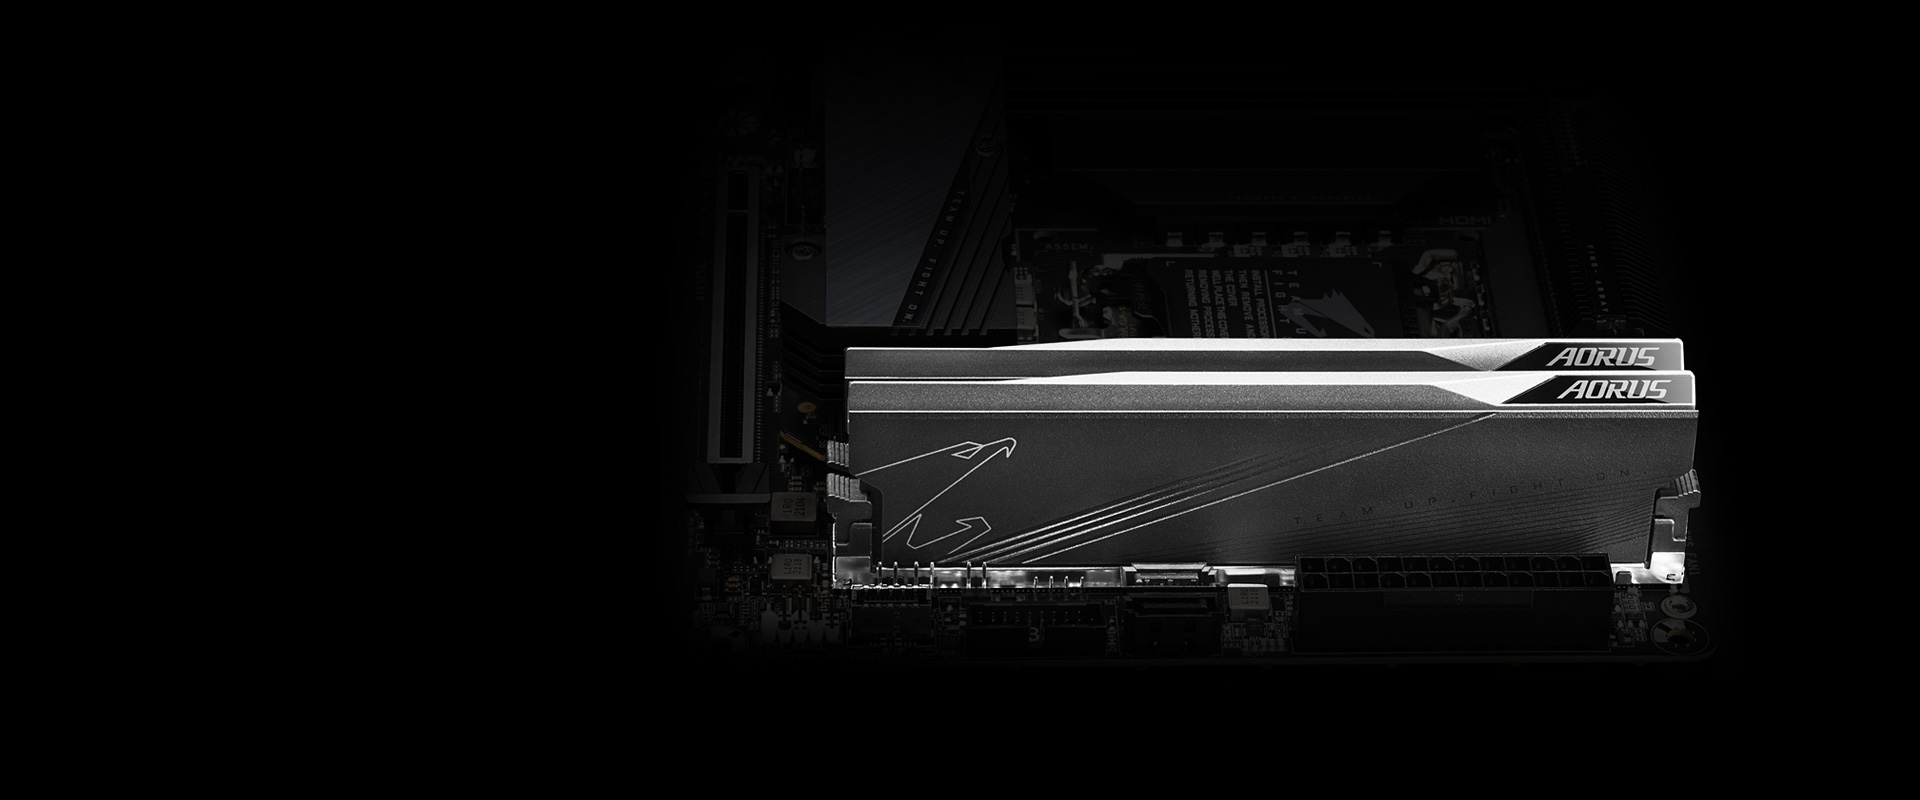
Unlock DDR5
Dual PCIe 4.0 x4 M.2
PerfDrive
Smart Fan 6

6+2+1 Phases Hybrid Digital VRM Design
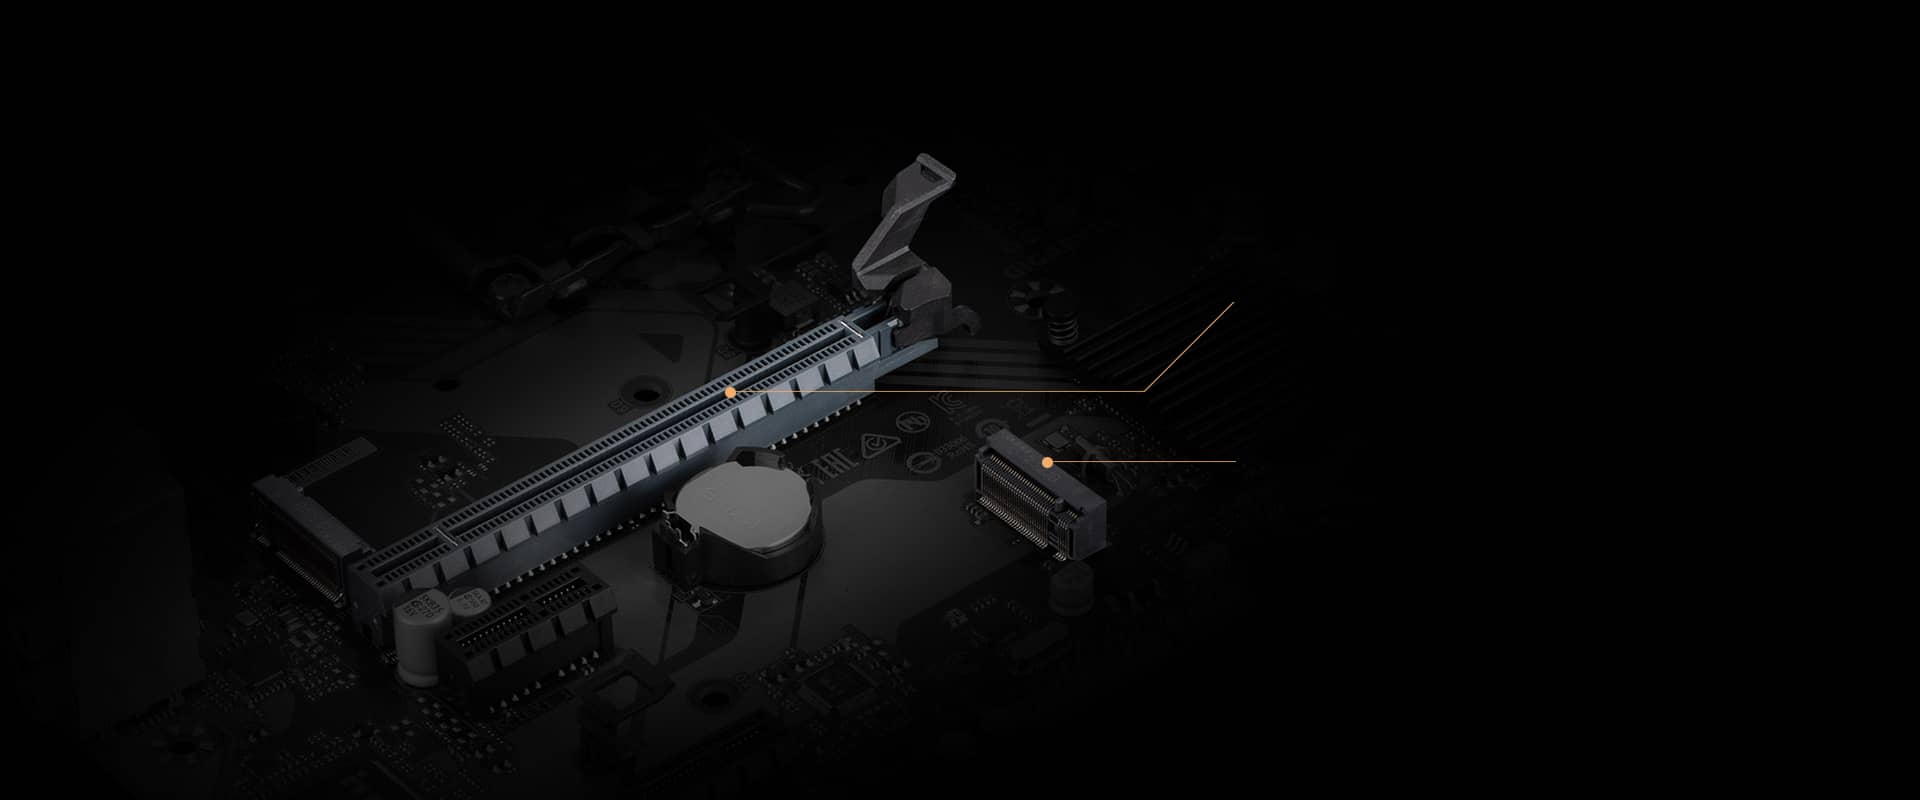
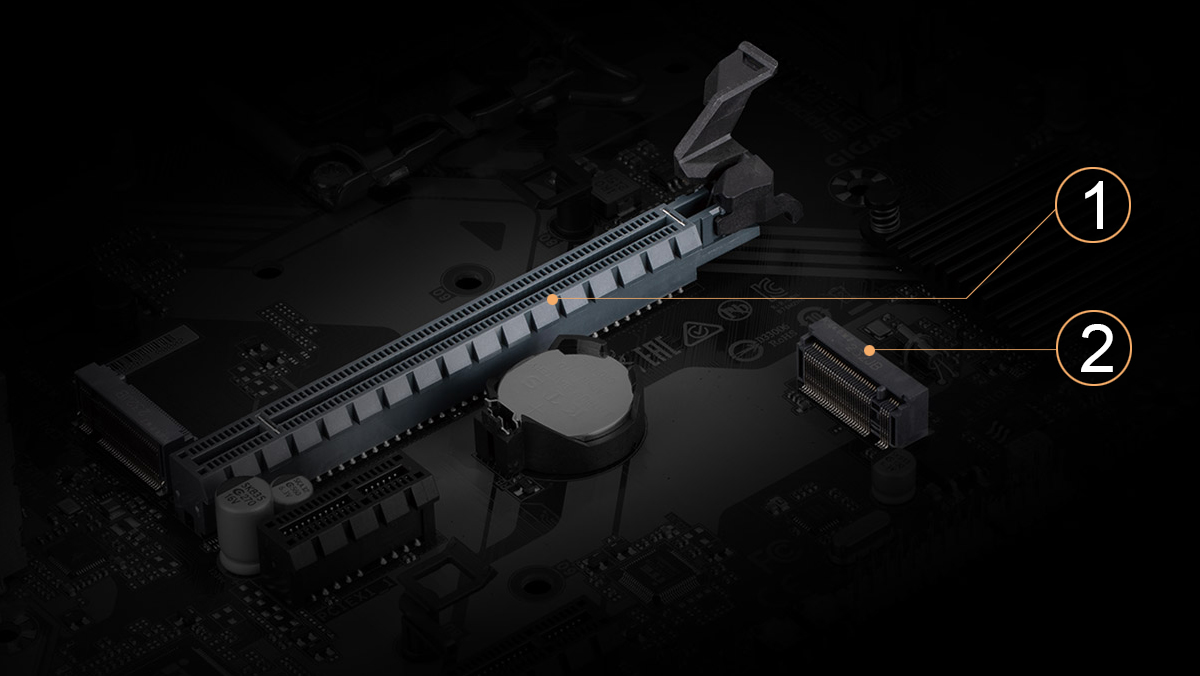

GIGABYTE B760 Motherboards are ready to work with the PCIe 4.0 devices which are expected to experience triple bandwidth than the current PCIe 3.0 devices. To reach the high speed and maintain good signal integrity, GIGABYTE R&D uses the low impedance PCB to provide the maximum performance.
1. PCIe 4.0 x16 slot
2. PCIe 4.0 M.2 slot
DDR5 Overclocking Up to 7200 and Beyond*
GIGABYTE is offering a tested and proven platform that has memory overclocking capability up to 7200 and beyond. For DDR5 XMP Memory, all users need to do to attain high memory performance boost is to ensure that their memory module is XMP capable and that the XMP function is activated and enabled on their GIGABYTE motherboard

*Memory overlocking and XMP profile support may vary depending on hardware configuration.
Please see the complete validated memory support list.
Product features may vary by model

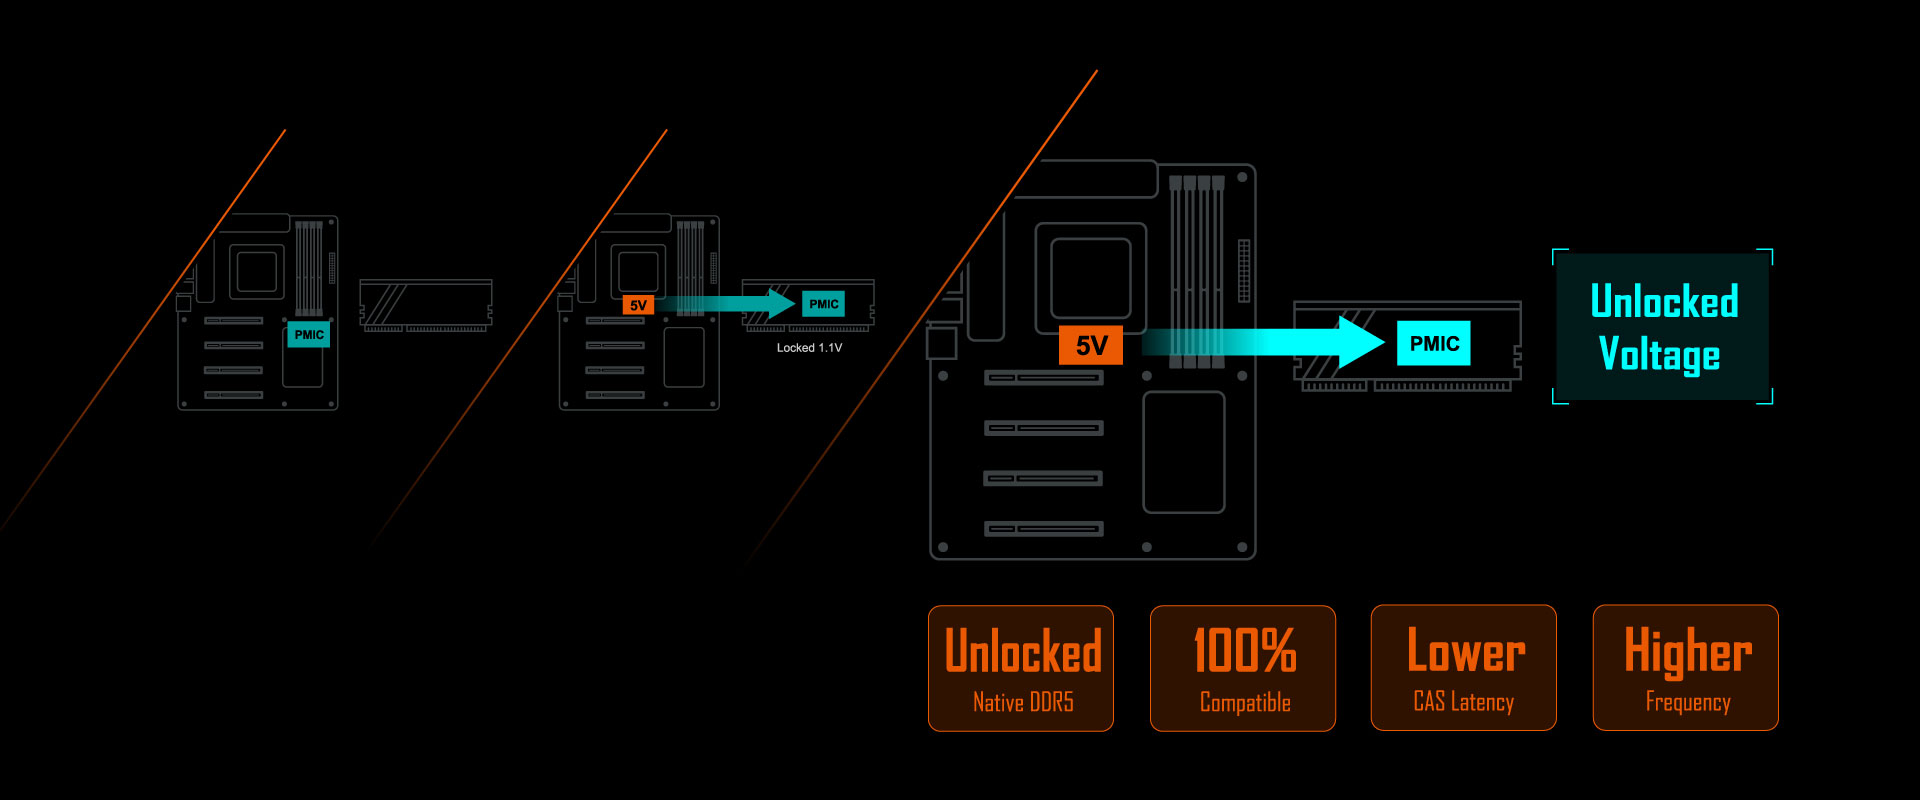
Unlock DDR5 Voltage
DDR4

DDR4 voltage is managed by MB with wide range
Native DDR5
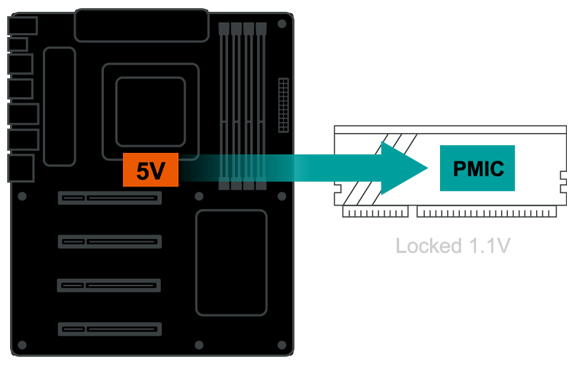
Secure Mode
MB provides fixed 5V to Native DDR5 memory and built-in PMIC outputs locked 1.1v to memory
IC.
GIGABYTE Exclusive DDR5 Circuit Design
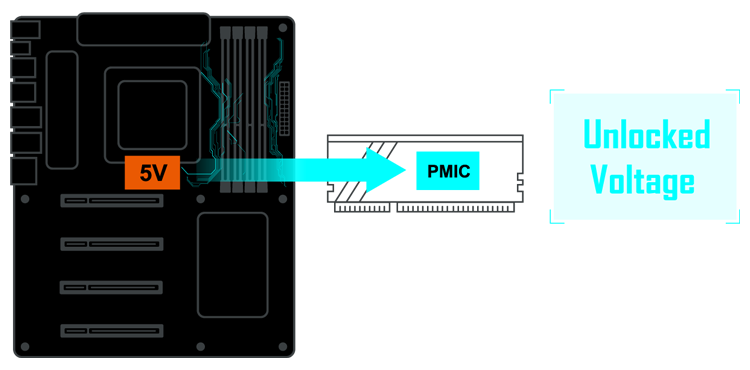
Programmable Mode
GIGABYTE’s exclusive design unlocks Native DDR5 PMIC secure mode into programmable mode and
control
Native DDR5 voltage with wide range.
- • GIGABYTE exclusive circuit design unlocks Native DDR5 voltage control
- • Transforms Native DDR5 memory module to Overclocked DDR5 memory
- • Increases DDR5 memory overclocking performance and capability
- • Supports all PMIC vendors for maximum compatibility
* Memory overclocking capabiblity will vary based on users' hardware configuration

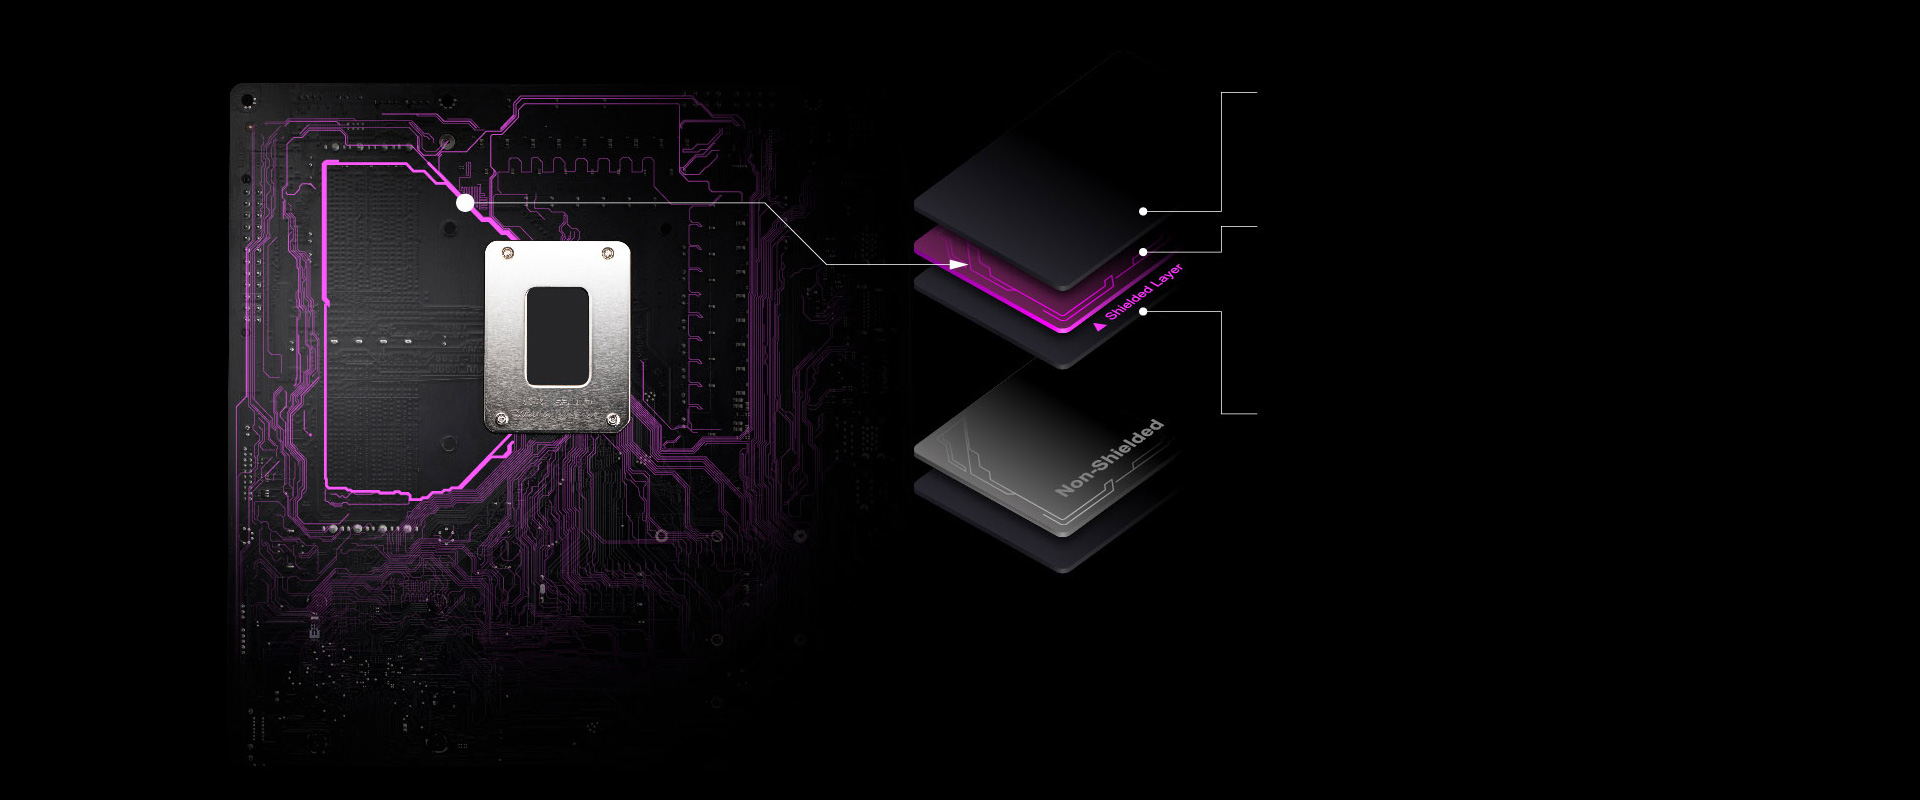
1. Shielded Memory Routing
All memory routing is under the PCB inner layer shielded by a large ground layer to protect from external interference.
2. Impedance Optimized Topology
By optimizing memory trace width, length and style from HPC simulation to actual implementation, overall impedance is lowered between CPU memory controller and memory modules to achieve higher DDR5 speed.
3. Low Signal Loss PCB
Server grade mid-loss or low-loss PCB material is chosen to lower signal loss inside PCB and maintain DDR5 high speed signal transmission.
DDR5 Auto Booster
Automatically Boost the Native DDR5 frequency to 5000MHz while the system is
under heavy loading by a single click.


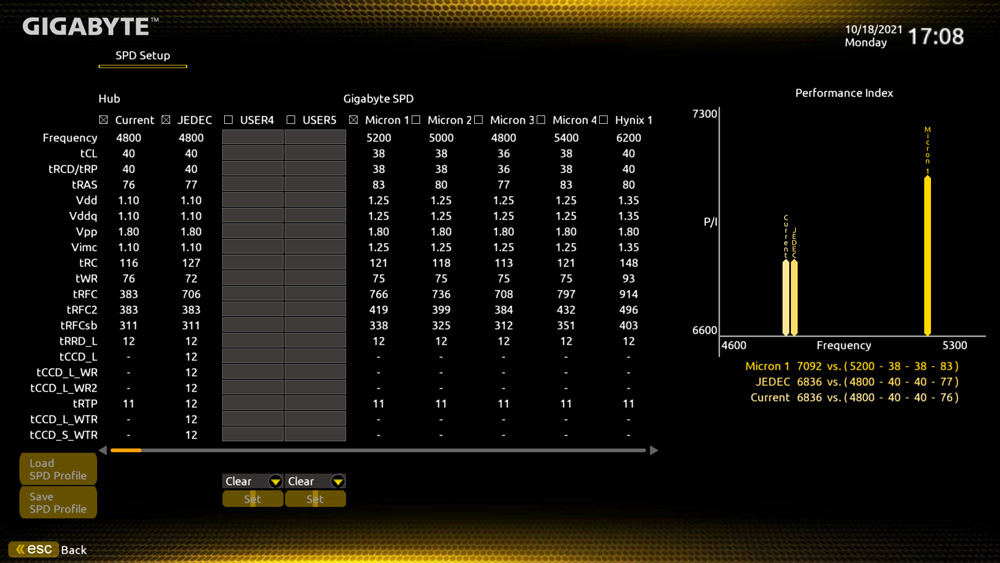
DDR5 Memory Upgrade
GIGABYTE BIOS offers pre-defined and retrievable profiles for users to get
higher
performance easily. The profiles are based on a database that is created by
checking
each memory IC and PMIC vendors to optimize the modules to unleash their
full
potential. This is a time saving feature to manually configure overclocked
DDR5
memory kits.
- • Instantly upgrade memory performance
- • Overclock Native and XMP 3.0 DDR5 memory to higher frequency easily
- • No need to input dozens of memory parameters such as clock, voltage and timings
- • Built-in wide variety pre-tuned profiles database for different memory IC vendors

*DDR5 MEMORY UPGRADE involves DDR5 memory overclocking,
overclocking capability depends on users’ hardware configuration
overclocking capability depends on users’ hardware configuration
XMP 3.0 User Profile
Define and create your own SPD profile into Native and XMP 3.0 memory modules or apply the pre-tuned profiles to XMP 3.0 User Profile. Two user-defined profiles can be saved, loaded either locally or from/to an external storage device.
- • Two empty SPD profiles can be defined by users and carry to next computer
- • Transfer DDR5 XMP Booster profiles into XMP 3.0 User Profiles
- • Quick memory performance simulation based on user input clock and timing parameters
- • Profile save and load function to share your memory parameters online
SPD Re-defined or retrieve from database
Performance Simulation
Save/Load Profile
Overclocked Performance
Profile Clearance


GIGABYTE PerfDrive
PerfDrive technology integrates multiple GIGABYTE exclusive BIOS settings to allow users to balance between different levels of performance, power consumption, and temperature according to their needs easily when using 13th gen Intel® Core™ processors.

Max Turbo
Optimization
Spec Enhance
E-Core™ Disable

Max Turbo allows Intel® 13th Gen. Core™ CPU to run at Maximum Turbo Boost speed.
The Optimization mode enables Intel® 13th Gen. Core™ CPU to balance between high performance and low temperature.
The Spec Enhance mode enables Intel® 13th Gen. Core™ CPU to run at high performance under a lower temperature setting.
The E-Core™ Disable mode allocates CPU resources to P-core exclusively to boost its gaming performance, while diminishing the overall power consumption of processors.

* Features and function vary depending on Motherboard and CPU specifications, image is for reference only.
SMART FAN 6
Smart Fan 6 contains several unique cooling features that ensure gaming PC maintain its performance while staying cool and quiet. Multiple fan headers can support PWM/DC fan and pump, and users can easily define each fan curve based on different temperature sensors across the board via intuitive user interface.
Cooling Features
- High Current Support
- Precision Control
- Dual Curve Mode
- Fan Stop
Each fan headers support PWM and DC fan and Water Cooling Pump , and up to 24W (12V x 2A) with Over-Current Protection
Multiple temperature/fan speed control points for precise fan curve
Slope/Stair dual mode for different user scenario
Fan can stop completely below users' specified temperature point
 PWM/DC Fan Headers
 Internal Temperature Sensors
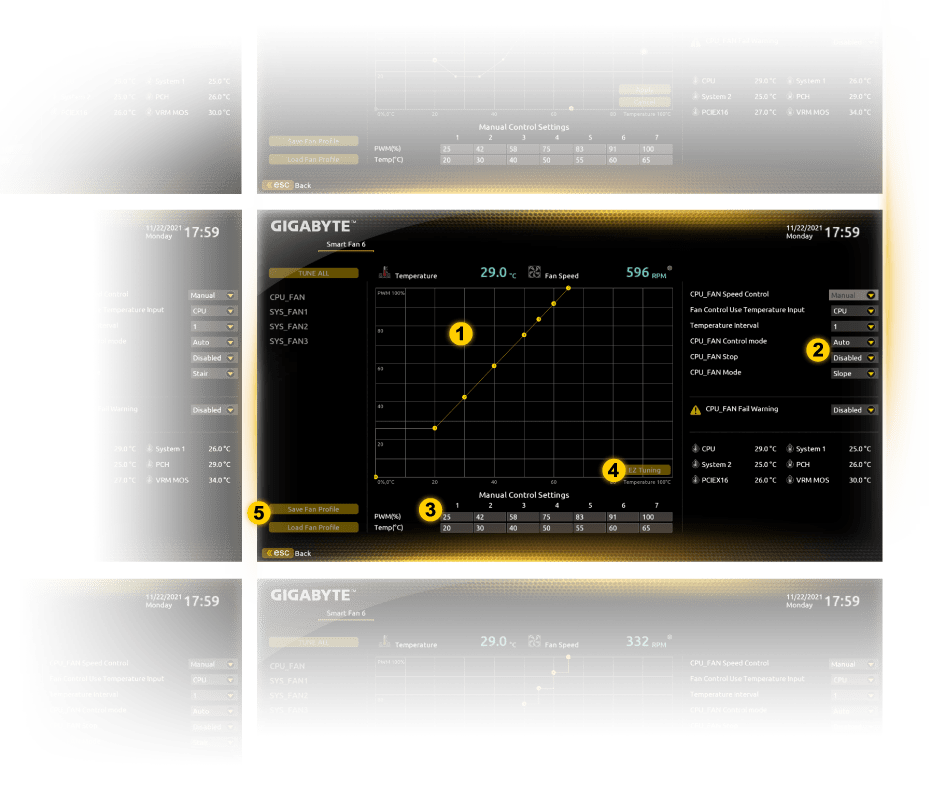
Smart Fan 6 BIOS UI
1
Improve fan curve UI
We increase control points from 5 to 7 and larger fan speed graph for
precise
and easier fan curve
control.
2
Slope/Stair dual graph mode
Fan curve can be quickly switch with Slope and Stair modes for different
user
scenario. Slope is
traditional and
intuitive linear fan speed curve. With newly added Stair non-linear
mode, fan
keeps at same speed
between specified
temperature interval.
3
Manual Input
For advanced users, we provide fan speed manual input for more precise
control.
4
EZ Tuning
Use can place 4 EZ Tuning points at rough temperature/fan speed, and
Smart Fan 6
can quickly generate a
fan curve.
5
Fan curve profile
Fan curve profile can be saved in BIOS ROM, profile will be kept after
updating
BIOS.
Note: The picture is for reference and may vary by model.

CONNECTIVITY
CONNECTIVITY
2.5GbE LAN
Hi-Fi Audio
CONNECTIVITY
GIGABYTE Motherboards enable the ultimate connection experience with blazing data-transfer speeds through the next generation network and storage.
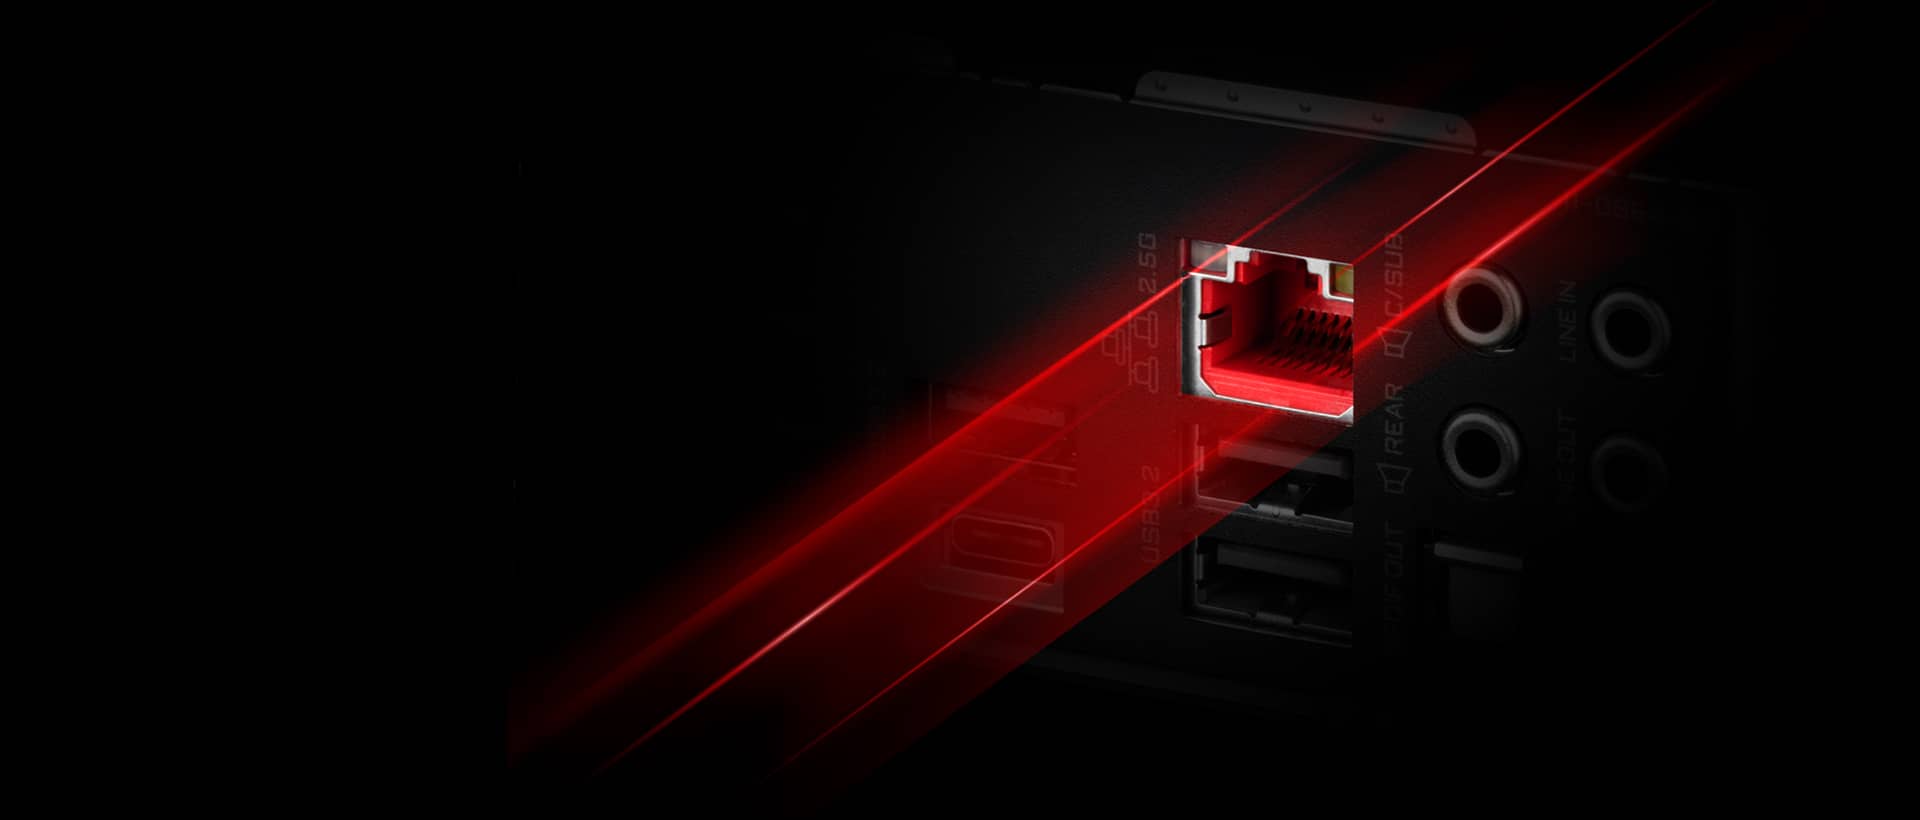
First adopter on 2.5GbE LAN onboard
2X Faster than ever

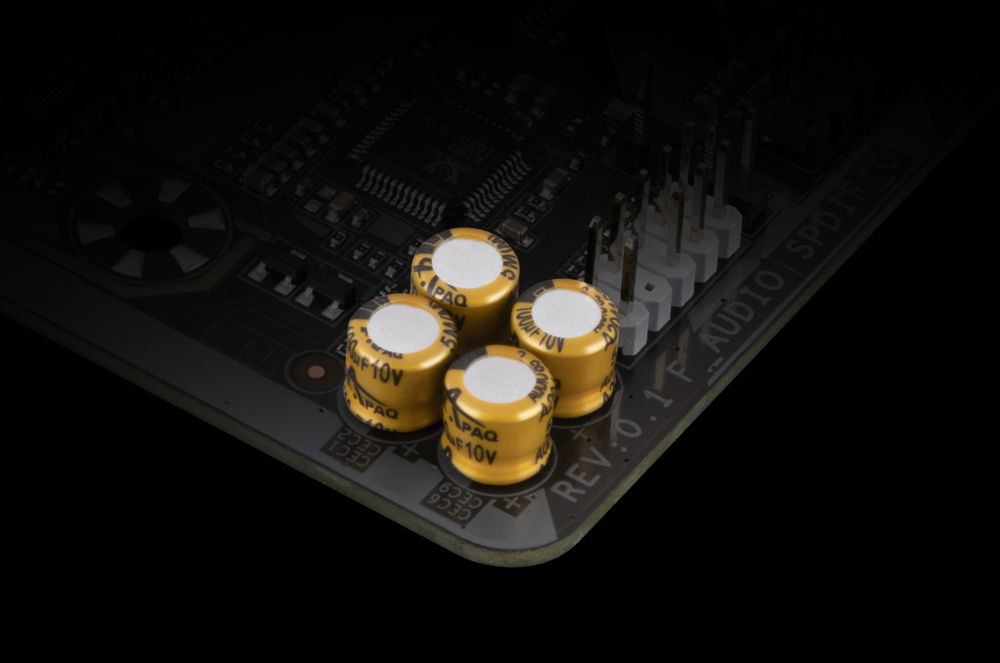
High-End Audio Capacitors
GIGABYTE motherboards use high-end audio capacitors. These high quality capacitors help deliver high resolution and high fidelity audio to provide the most realistic sound effects for gamers.
Audio Noise Guard
GIGABYTE motherboards feature an audio noise guard that essentially separates the board’s sensitive analog audio components from potential noise pollution at the PCB level.

PERSONALIZATION
PERSONALIZATION
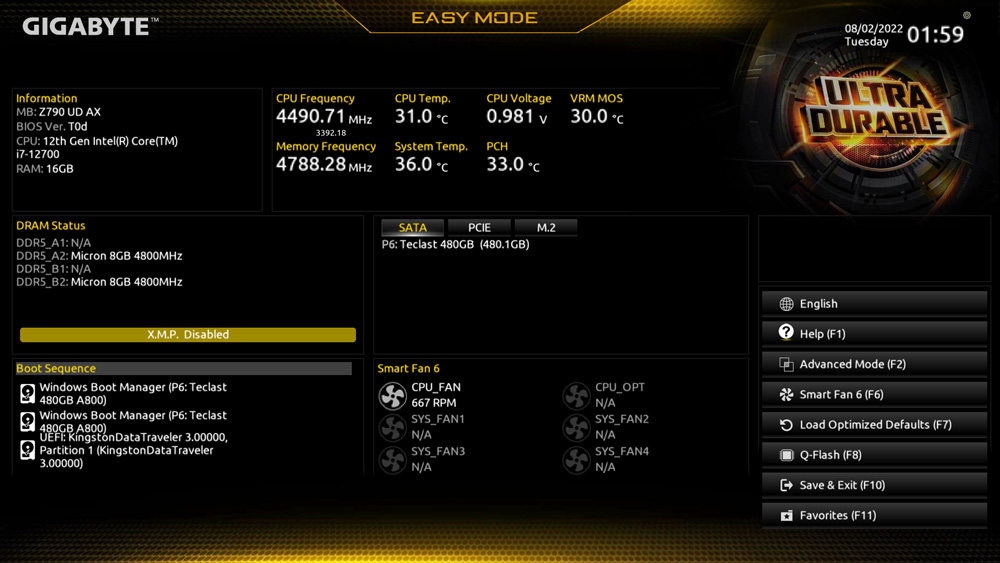
UEFI BIOS
GIGABYTE Control Center
Friendly User Interface
The EASY MODE shows important hardware information in one page including CPU clock, Memory, Storage, Fan.
My Favorites
Add constantly used items into the favorite menu for quick access.
Storage Information
Show all kinds of storage information including SATA, PCIE and M.2
interface.
Changelog
List all changes before saving and exiting bios. Quickly review overall
settings
modification.
Intuitive Load Line Curve
Clearly show each loadline calibration setting in an intuitive curve graph.

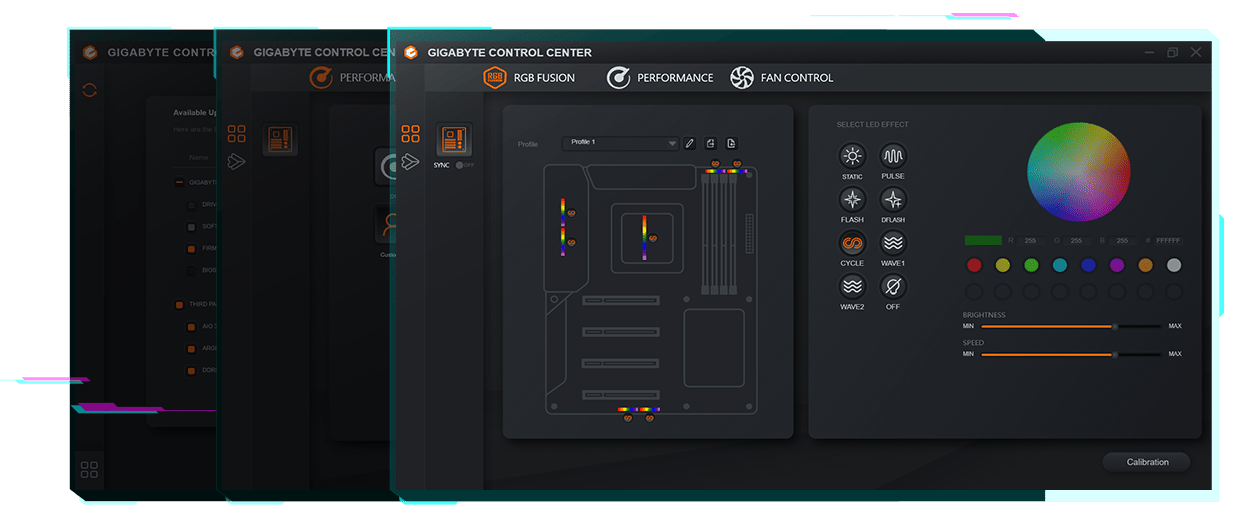
GIGABYTE CONTROL CENTER (GCC) is a unified software for all GIGABYTE supported products. It provides newly designed intuitive user interface to control all essential function.
- Unified software platform for all Gigabyte supported products
- Intuitive user interface for an eased experience
- Modularized control components only for installed hardware
- Auto update function to keep system up to date and support future products

ULTRA DURABLE
ULTRA DURABLE
DIY Friendly
Q-Flash Plus


PCIe EZ-Latch
Unlock the latch of the PCIe slot easily when remove the graphics card in the PCIe slot.
* Photo for reference only.

Q-Flash Plus
Update the BIOS easily without installing the CPU, memory and graphics card.
With GIGABYTE Q-Flash Plus, you don't need to install the CPU, memory and graphics card nor enter the BIOS menu to flash the BIOS. Just download and save a new BIOS file (rename to gigabyte.bin) on the USB flash drive, then press the dedicated Q-Flash Plus button and you’re good to go!
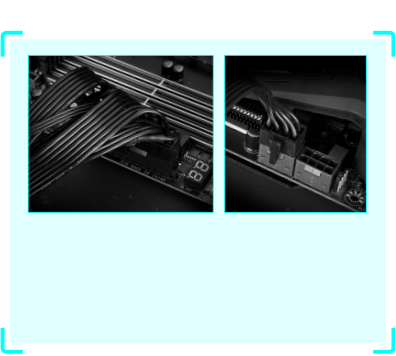
STEP 1.
Plug 24pin & 8pin power supply cable on motherboard

STEP 2.
Download motherboard BIOS file and rename to "gigabyte.bin", save to USB flashdrive, and plug USB flashdrive into Q-Flash USB port
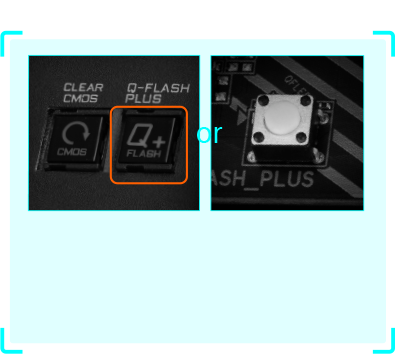
STEP 3.
Press Q-Flash Plus button, and motherboard will start updating BIOS automatically.
* 词语 HDMI、HDMI High-Definition Multimedia Interface(高清晰度多媒体接口)、HDMI 商业外观和 HDMI 徽标均为 HDMI Licensing Administrator, Inc. 的商标或注册商标。
* 实际出货规格及产品外观依各国家地区可能有所不同,我们诚挚的建议您与当地的经销商或零售商确认目前贩卖的产品规格及样式。
* 产品颜色可能会因拍照光线误差或屏幕设定而与实际产品有所差异。
* 我们会尽力提供正确与完整的数据于网页上,并保留更动、修正页面信息的权利,恕不另行通知。
